High-quality photos are key to showcasing your amazing Tesla Roadster! To help you showcase your vehicle effectively, we’ve created this walkthrough guide with tips for taking outstanding photos. Whether you’re using a professional camera or a smartphone, following this advice will ensure your photos turn out great and tell the story of your vehicle!
Give your Roadster a thorough cleaning to make it shine. Wash, dry, and clean the interior, including vacuuming. Remove any personal items or belongings that won’t be included with the car. Presenting your car in the cleanest condition possible will make a great impression.
Choose a scenic location
To achieve the best photos, aim to shoot outdoors whenever possible. If the weather is unsuitable or the car cannot be moved, adjust accordingly, but outdoor settings are preferred. Avoid photographing the car in your driveway or near your home. Instead, find an open, uncluttered area or a scenic spot with no distractions, such as other cars, people, or background clutter.
During the Photoshoot
Get your camera ready
Always hold your smartphone or camera horizontally (landscape) for every shot. This orientation captures more of the vehicle and makes it easier to crop and arrange photos for your listing. Most modern smartphones offer multiple zoom modes, including wide angle, standard, and telephoto lenses. For vehicle photography, stick to the standard mode (1x) for most shots and reserve wide-angle mode for tight interior spaces. If you need to adjust the framing, avoid using digital zoom—simply move closer or farther from the car to get the perfect shot.
Choose the best natural lighting
Aim to take your photos in open shade, overcast conditions, or during the late afternoon when the sunlight is softer. If shooting midday, position the vehicle in consistent shade rather than under dappled lighting, like that found beneath trees or parking structures. Don’t hesitate to reposition the car to avoid harsh shadows or overly bright spots. If daylight is fading, avoid using flash; instead, move the vehicle to a brighter area or consider rescheduling for a better time of day.
Exterior Walkaround
Begin by taking a complete walk-around of the exterior
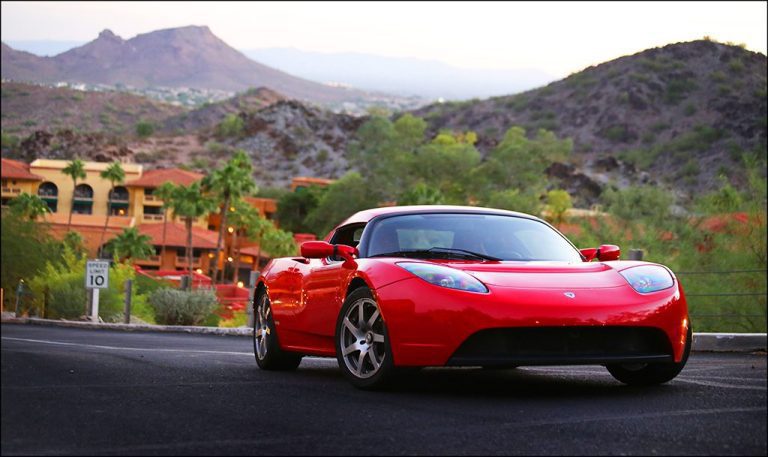
Begin by taking 12-15 overview shots of the exterior, ensuring the entire vehicle fits within the frame with some space around it. Stand about 10 feet away and capture photos of the front, rear, both sides, and angled views from all four corners. Make sure the hood, trunk, and all doors are closed for these shots. If the vehicle has a convertible top, take two sets of photos: one with the top up and one with it down. This provides a complete and professional view of the vehicle.
Image gallery
These photos are a great example of a clear walk-around, capturing the car from both sides, the front, the back, and all four corners. Since this is a convertible, the shots include two sets of angles: one with the top down and another with the top up, providing a complete view of the vehicle.
Exterior Details
Next, zoom in on the exterior details
After capturing the glamour shots, shift your focus to close-ups of the details. Document any imperfections, such as paint blemishes, dents, dings, corrosion, or other signs of wear. Transparency is essential—showcasing flaws upfront often leads to better outcomes than having them discovered later during the auction or after delivery. Even if your vehicle is in excellent condition, don’t skip these shots. Instead, use close-ups to highlight the fine details that set your car apart and make it truly shine.
Interior Shots
Capturing interior photos: the outside-in technique
Position yourself outside the vehicle for optimal interior photography. For rear seats, frame both seats in your shot. For front cabin views, capture the full dashboard and steering wheel in a single frame. This method provides the best angles and lighting for showcasing the vehicle’s interior features.
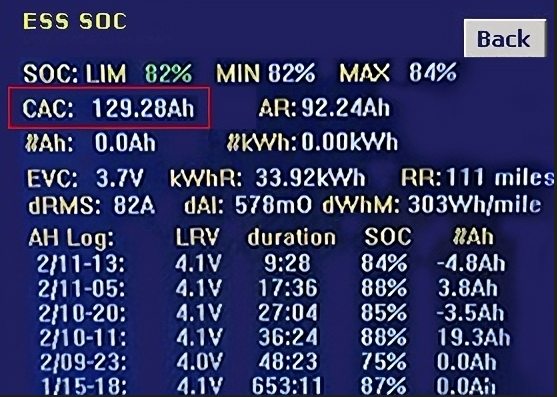
Calculated Amp Hour Capacity
This information is a vital specification that tells the prospective buyer what the condition of the ESS Main Battery Pack is.
Supplying an image of the VDS screen with this information helps Roadster buyers make an informed decision.
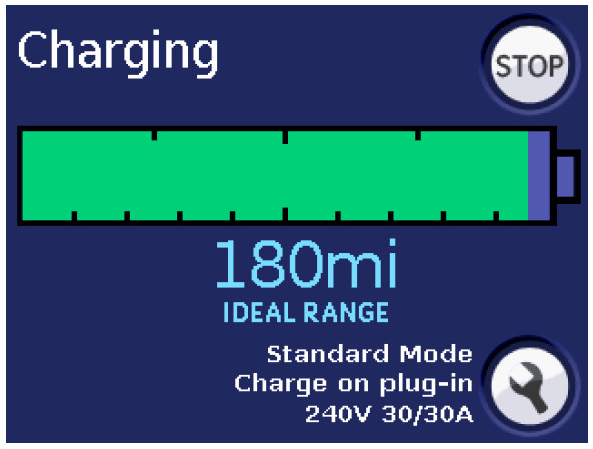
It is not recommended full charges are performed on Roadsters. Standard Mode Charge stops at 85%, and this is also a level carefully watched by prospective buyers.
Like CAC, it is also an indication of the condition of the ESS Main Battery Pack.
To collect this screen, use the Yellow Charge Cable and let the Roadster charge until it stops.
Take a picture of the mileage level and supply that as well.
Driver's Seat
Document from the driver's perspective
Start with the odometer and gauge cluster readings. Then photograph key operational features: stereo system, climate controls, shifter mechanism, and high-wear areas like armrests, control switches, and seat edges. This systematic approach ensures you capture all essential interior elements.
Undercarriage
Document the vehicle's undercarriage thoroughly
A vehicle lift provides optimal access for underbody photography, but ground-level shots can work effectively. For low-clearance vehicles, consider using ramps or jack stands for better angles. Systematically document from front to rear:
Engine and transmission
Rocker panels
Suspension components
Wheel wells and brake systems
Tires and wheels
Note any rust, damage, or fluid leaks
This methodical approach ensures comprehensive documentation of the vehicle’s underside condition. For safety, ensure proper vehicle support before beginning inspection.
VIN tags and markings
VIN Tags and Manufacturer Markings
Capture clear, legible photos of all vehicle identification markers including:
Vehicle Identification Number (VIN)
Factory data plates
Original stickers and labels
Cross-reference the VIN against your title documentation to ensure they match. These details are crucial for authenticity and record-keeping.
Are you ready?
Image Requirements:
Photos must be current (under 6 months old)
Exception: Historical or restoration progress photos
Maximum file size: 10MB per image
Minimum image quality: 90%
Transfer & Upload Tips:
Use cloud storage (WeTransfer, Dropbox, Google Drive) to preserve image quality when moving from smartphone