

Battery – Auxiliary – 12V (RWD) (Remove and Replace)
FRT No: 17011002
Warning: If the 12V power supply is disconnected, do not attempt to open any doors with door glass in closed position. Failure to follow this instruction could result in door glass shatter.
Note: Before disconnecting the 12V power supply, ensure that the driver’s door window is fully open. Failure to follow this instruction could result in vehicle lockout.
Removal
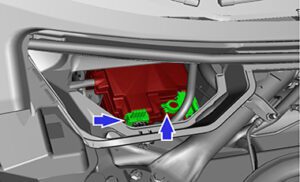
- Remove the pollen filter rear housing:
- Loosen the top right nut that secures the pollen filter rear housing to the bulkhead (torque 6 Nm).
Note: It is not necessary to completely remove the nut; the tab on the housing is notched.

- Remove the remaining nuts (x3) that secure the pollen filter rear housing to the bulkhead (torque 6 Nm).
Note: The 2 lower nuts secure the HVAC intake drain diverter.

- Loosen the top right nut that secures the pollen filter rear housing to the bulkhead (torque 6 Nm).
- Disconnect the negative battery connection. Lay the negative cable to the side of the battery.
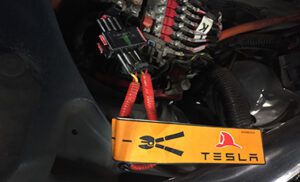
- Unplug the first responder’s loop (Do Not Cut!). Wait at least two minutes for all electrical circuits to fully discharge. Failure to unplug the first responder’s loop will void your 12V battery warranty!
- Release the lugs (x4) that secure the battery fuse box cover. Remove the cover.

- Remove the nut that secures the battery positive terminal to the fuse box (torque 12 Nm).

- Remove the nut that secures the battery fuse box to the battery strap. Tie the battery fuse box aside (torque 6 Nm).

- Remove the nuts (x2) that secure the battery strap (torque 3.5 Nm). Remove the strap.

- Carefully lift the battery, turn it counter clockwise 90°, and remove it through the opening.
 Note: It can be difficult to remove C&D brand batteries because they do not have handles. It might be helpful to use duct tape in order to lift the battery high enough so that it can be supported from the bottom:
- Using the handle, slowly lift the battery until it can be supported from the bottom.
Warning: Do not use the handle to fully lift the battery out of the vehicle. Only lift the battery high enough so that it can be supported from the bottom.

- Using the handle, slowly lift the battery until it can be supported from the bottom.


Installation
Installation procedure is the reverse of removal, except for the following:
- Ensure the first responder’s loop is connected before the 12V battery negative connection! This ensures the high voltage system provides 12V power to the 12V battery as soon as the 12V battery is installed. Not doing so will cause the 12V battery to discharge below a point where the high voltage system will provide 12V power and void your 12V battery warranty.
- Ensure that the HVAC intake drain diverter is positioned properly when reinstalling the pollen filter front housing.
 Caution: Take care not to damage component(s).


